Connect your
Home Assistant with Modbus now
Home Assistant with Modbus now
Seamlessly integrate your Anker Solix devices with your smart home
IMPORTANT WARNING
- This guide is based on the Home Assistant integration officially supported by Anker
- Please make sure your device firmware version supports the local API feature
- Before using this feature, please carefully read the device manual and safety warnings
- Improper use may affect device warranty or cause device damage
Supported Devices
STORAGE SYSTEMS
- Anker SOLIX Solarbank Max AC
- Anker SOLIX XE AC
- Anker SOLIX Solarbank Max
- Anker SOLIX XE
- Anker SOLIX Solarbank 4 E5000 Pro
ACCESSORIES
- Anker SOLIX Smart Meter Gen 2
- Anker SOLIX Smart Plug
Prerequisites

- Home Assistant installed and running
- HACS (Home Assistant Community Store) installed
- Home Assistant and Anker devices are on the same local network
- The device has completed initial setup via the Anker App
- The device firmware version supports local API (please upgrade the firmware version via the App)
- The device supports ModBus TCP protocol
- The device is connected to a stable Wi-Fi network
Home Assistant Installation and Configuration
Method 1: Install via HACS (Recommended)
- Install HACS
- If you haven't installed HACS yet, please refer to the Official HACS Installation Guide
- Open the Home Assistant frontend and go to the HACS panel.
- Click the three-dot menu in the upper right corner and select "Custom Repositories".
- Add the Anker Solix repository:
- Repository URL: https://github.com/anker-charging/ha-anker-solix-official
- Type: Integration
- Click "Add", search for "Anker Solix" in HACS, and click "Download" to install the integration.
- Restart Home Assistant
- After installation is complete, you must restart Home Assistant to load the new integration.
Method 2: Manual Installation
- Download Integration Files
- Visit the Anker Solix GitHub Repository
- Download all files in the custom_components/anker_solix/ folder
- Copy Files to Home Assistant
- Open the Home Assistant configuration directory (usually /homeassistant)
- If there is no custom_components folder, please create one
- Create an anker_solix folder within custom_components
- Place the downloaded files into this folder
- Restart Home Assistant
Device Access and Authentication
1
Add Integration
- In the Home Assistant frontend, go to "Settings" → "Devices & Services"
- Click the "+" button in the bottom right corner
- Search for "Anker SOLIX Official"
- Click to select the integration
2
Configure ModBus TCP Connection
Enter the following information in the pop-up configuration dialog:
Required parameters:
- Device IP Address: Local network IP copied from Anker App Three‑Party Control Settings (e.g.: 192.168.1.100)
- Port: ModBus TCP port number, usually 502 (default)
Connection Settings (Optional):
- Timeout: The default value is usually 3 seconds
- Retry attempts: Number of retries when the connection fails
3
Verify Connection
After configuration is complete, verify that the device is connected successfully:
- Home Assistant will attempt to connect to the device via ModBus TCP
- After a successful connection, device entities will be automatically discovered
- You should see your Anker device on the integration page
- Click the device to view all available entities (sensors and controllers)
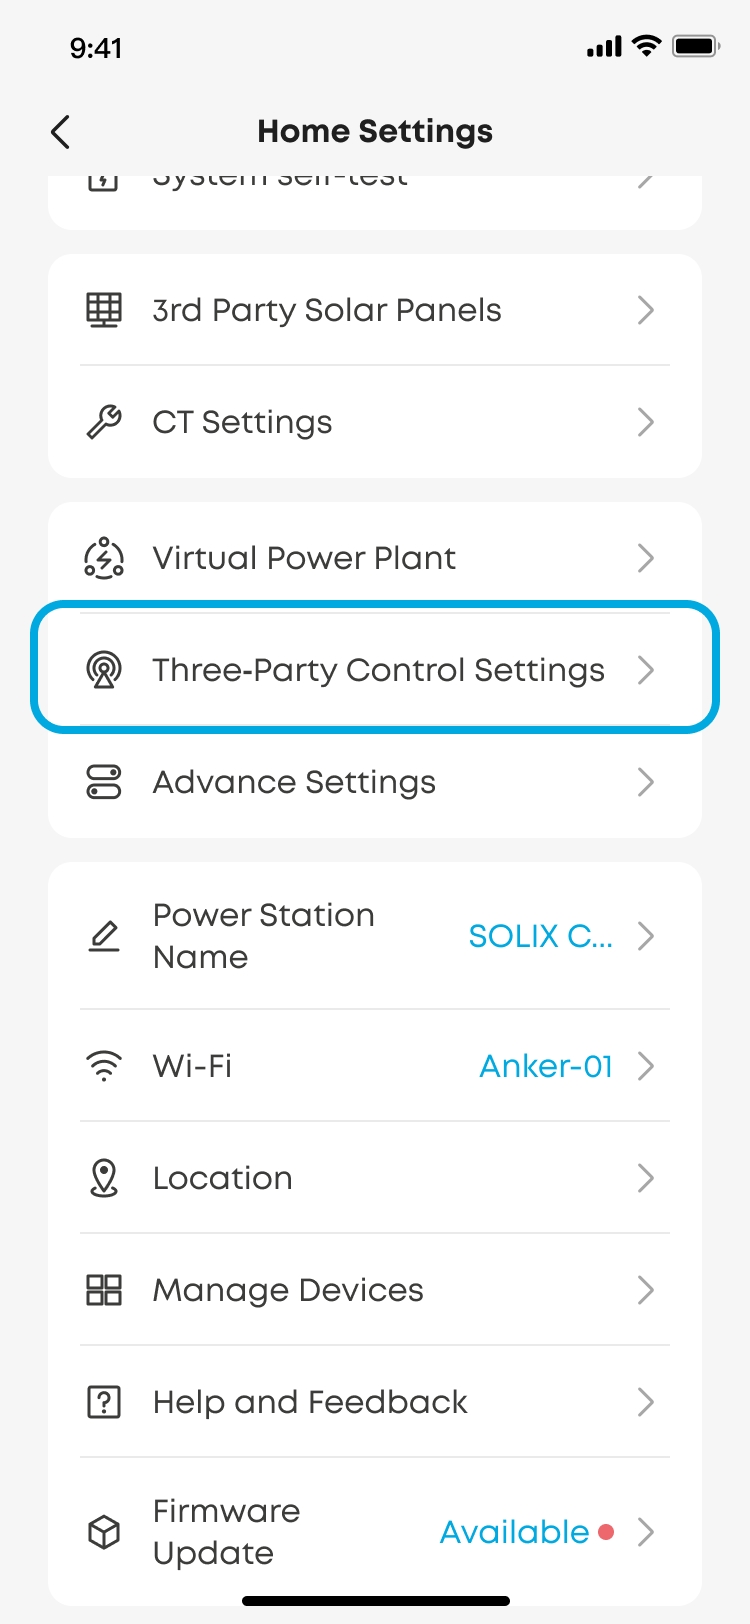
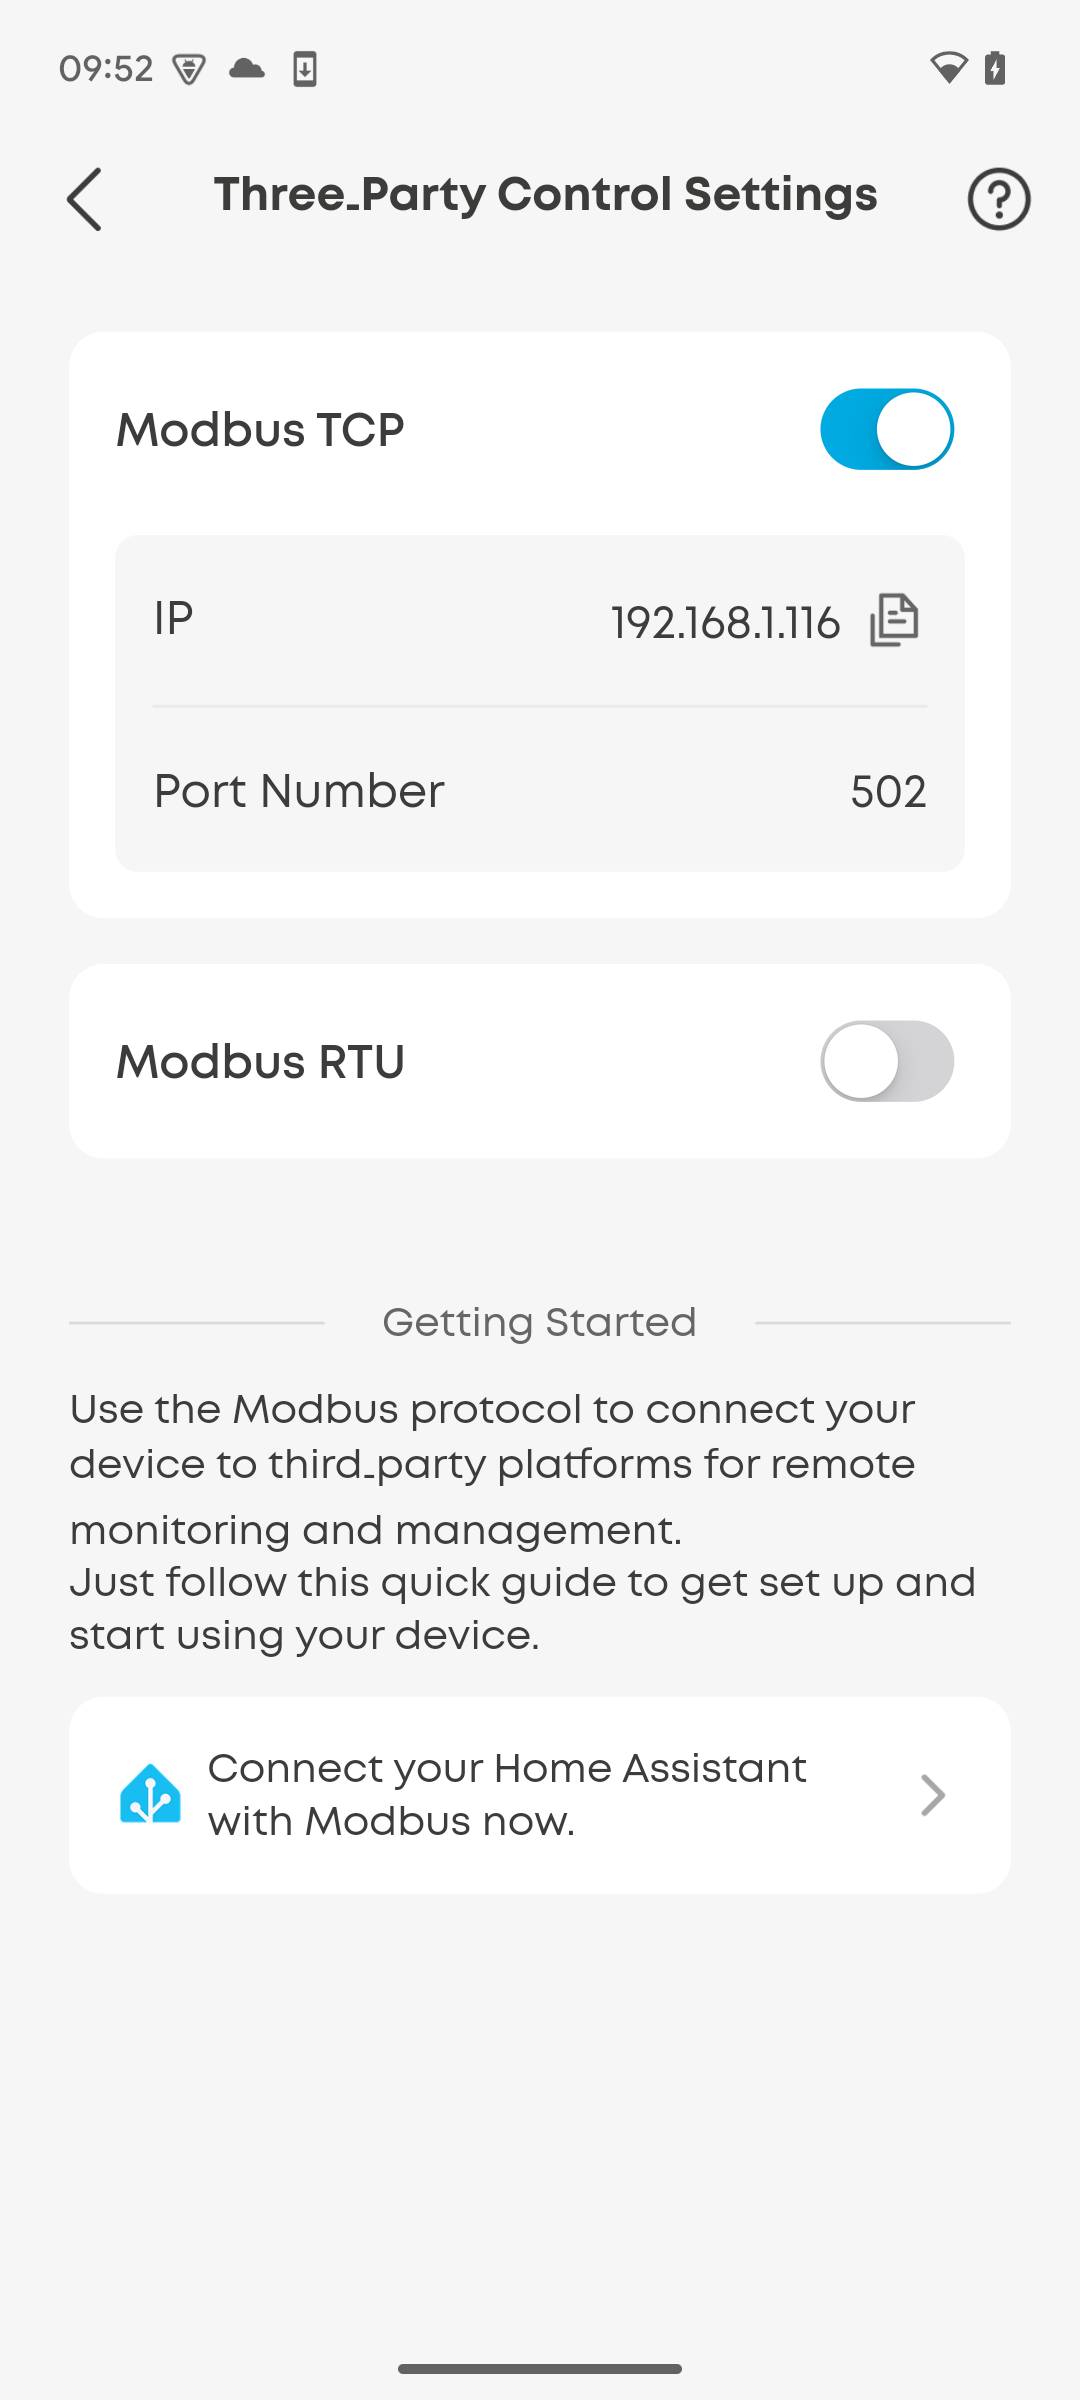
Troubleshooting:
- If the connection fails, check if the IP address is correct
- Make sure the device and Home Assistant are on the same local network
- Try pinging the device IP to test network connectivity
- Ensure that the ModBus TCP switch is enabled in the Anker App
- Check if the router firewall settings are blocking port 502
- Check the Home Assistant logs for detailed error information
Function Description
Practical Examples
Preparation
Enter the Home Assistant configuration interface
- Click Settings in the left menu
- Click Automations & Scenes
- There are three tabs: Scenes, Automations, Scripts
- Scenes: One-click state snapshots. Used to instantly switch multiple devices to preset values. For example, one‑click to set the energy storage device to Emergency Charging Mode, or one‑click to turn off all non‑essential sockets.
- Scripts: A sequence of actions executed in order. Can include logic judgments, delays, and other complex operations. For example, start charging and stop automatically after 1 hour, or reboot a socket (off‑wait‑on).
- Automations: Automatically execute actions when conditions are met. This is the core of smart home. You can set triggers (e.g., battery SOC below 10% or smart meter detecting grid feed‑in) to let the system automatically adjust device strategy.
(Note: To adjust the specified power value of a device in HA, select the device in the action, find the corresponding power control entity, and enter the specific wattage in the pop‑up number input box)
Practical Configuration 1: Surplus Power Utilization
Objective
Automatically turn on the heat pump socket to consume surplus power when the device SOC > 95% and PV power generation > 300W.
Operation Logic
Trigger A (Turn On): Battery SOC > 95% and main meter grid feed-in power > 300W (i.e., power value < -300, lasting for 5 minutes) → Turn on the heat pump socket
Configuration Steps (Automation)
- Switch to the Automations tab, click Create Automation in the bottom right corner → Create new automation
- Add trigger condition (When)
- Click Add Trigger → Select device: Electricity Meter
- Entity: Main Meter Total Power
- Below: -300
- For: 00:05:00
- Add condition (And if)
- Click Add Condition → Select device: Energy Storage
- Entity: Battery SOC
- Above: 95
- Add action to execute (Then do)
- Click Add Action → Select device: Smart socket corresponding to heat pump
- Action: Turn on switch
- Save and name it: Surplus Power Utilization
Practical Configuration 2: Smart Overload Protection
Objective
When household power consumption is too high, make the battery discharge at full speed to prevent the whole house from tripping or power limitation.
Operation Logic
Trigger A (Overload) - Main CT Total Active Power > 10,000W (for 3 seconds) → Set specified discharge power to 5000W
Trigger B (Recovery) - Main CT Total Active Power < 5,000W (for 10 seconds) → Reduce specified discharge power to 100W (standby)
Configuration Steps (Automation)
- Switch to the Automations tab, click Create Automation in the bottom right corner → Create new automation
- Add trigger condition (When)
- Click Add Trigger → Select device: Smart Meter
- Entity: Main CT Total Active Power
- Above: 10000
- For: 00:00:03
- Click ⋮ in the top right corner of this trigger → Edit ID → Enter overload_start
- Click Add Trigger again → Select device: Smart Meter
- Entity: Main CT Total Active Power
- Below: 5000
- For: 00:00:10
- Click ⋮ in the top right corner of this trigger → Edit ID → Enter overload_end
- Add action to execute (Then do)
- Click Add Action → Building Blocks → Choose
- Option 1 (Overload Start)
- Condition: Click Add Condition → Trigger → Select overload_start
- Action: Click Add Action → Select device: Energy Storage → Set specified discharge power to 5000
- Option 2 (Overload Recovery)
- Condition: Click Add Condition → Trigger → Select overload_end
- Action: Click Add Action → Select device: Energy Storage → Set specified discharge power to 100
- Save and name it: Smart Overload Protection
Practical Configuration 3: Severe Weather Backup Power
Objective
When a thunderstorm or blizzard warning is detected, force charging the battery fully from the grid to improve blackout resistance.
Operation Logic
Trigger A (Backup Power) - Weather changes to thunderstorm or blizzard → Switch control mode to "Charge" and set specified charging power to 5000W
Configuration Steps (Automation)
- Make sure you have added a local weather service to Home Assistant (e.g., the default Meteorologisk institutt)
- Switch to the Automations tab, click Create Automation in the bottom right corner → Create new automation
- Add trigger condition (When)
- Click Add Trigger → Select State
- Entity: Select your weather entity (e.g., Local Weather)
- To: Enter lightning-rainy
- Add action to execute (Then do)
- Step 1: Switch Control Mode
- Click Add Action → Select device: Energy Storage
- Action: Set Control Mode to Charge
- Step 2: Set Full-speed Charging Power
- Click Add Action → Select device: Energy Storage
- Action: Set specified charging power to 5000
- Save and name it: Severe Weather Backup Power
Practical Configuration 4: Dynamic Electricity Price Arbitrage
Objective
- Low price: Automatically charge with cheap electricity
- High price: Discharge to the grid from battery
Preparation
Install and configure a local real-time electricity price integration (using Tibber as an example):
- Go to Settings → Devices & Services → Add Integration
- Search and add Tibber, enter your API Token
- The system will automatically generate your Tibber real-time electricity price entity
Operation Logic
Trigger A (Low Price) - Electricity price ≤ 0.20 AND current battery SOC < 85% → Charge
Trigger B (High Price) - Electricity price ≥ 0.40 AND current battery SOC > 60% → Feed to grid
Configuration Steps (Automation)
- Switch to the Automations tab, click Create Automation in the bottom right corner → Create new automation
- Add trigger condition (When)
- Select Numeric state → Entity: Tibber Real-time Price → Below 0.20
- Click ⋮ in the top right corner → Edit ID → Enter low_price
- Add another trigger: Select Numeric state → Entity: Tibber Real-time Price → Above 0.40
- Click ⋮ in the top right corner → Edit ID → Enter high_price
- Add action to execute (Then do) → Building Blocks → Choose
- Option 1: Charge at Low Price
- Condition 1: Add Condition → Trigger → Select low_price
- Condition 2: Add Condition → Select device: Energy Storage → Entity: Current Battery SOC → Below: 85
- Action: Click Add Action → Select device: Energy Storage → Set Control Mode to Charge
- Option 2: Discharge at High Price
- Condition 1: Add Condition → Trigger → Select high_price
- Condition 2: Add Condition → Select device: Energy Storage → Entity: Current Battery SOC → Above: 60
- Action: Click Add Action → Select device: Energy Storage → Set Control Mode to Discharge (or Feed to Grid)
- Save and name it: Dynamic Electricity Price Arbitrage
Practical Configuration 5: Vacation Mode
Objective
During vacation, keep the battery charged and standby within a healthy range (SOC 40%~65%) to avoid long-term full-charge aging or complete depletion.
Operation Logic
Only when Vacation Mode is enabled:
- Trigger A: Current battery SOC < 40% → Allow charging
- Trigger B: Current battery SOC ≥ 65% → Stop charging
- Trigger C: Current battery SOC < 60% → Resume charging (anti-jitter)
Step 1: Create Vacation Mode Switch
- Go to Settings → Devices & Services → Helpers
- Click Create Helper → Toggle
- Name: Vacation Mode Switch
- Save
Step 2: Create Automation (combine three logics into one)
- Switch to the Automations tab → Create new automation
- Add trigger condition (When)
- Trigger 1: Device → Energy Storage → Entity: Current Battery SOC → Below 40 (Edit ID: soc_low)
- Trigger 2: Device → Energy Storage → Entity: Current Battery SOC → Above 65 (Edit ID: soc_high)
- Trigger 3: Device → Energy Storage → Entity: Current Battery SOC → Below 60 (Edit ID: soc_mid)
- Add condition (And if) - Only run during vacation
- Click Add Condition → State → Entity: Vacation Mode Switch → State: On
- Add action to execute (Then do)
- Click Add Action → Building Blocks → Choose
- Option 1 (Start Charging): Condition: Trigger (soc_low OR soc_mid) → Action: Device → Energy Storage → Set to Charge
- Option 2 (Stop Charging): Condition: Trigger (soc_high) → Action: Device → Energy Storage → Set to Standby (or No Charge No Discharge)
- Save and name it: Vacation Mode
FAQ
Q1: Cannot find the Anker integration in HACS?
- Make sure HACS is installed correctly and updated to the latest version
- Try adding the custom repository manually (refer to the installation steps)
- Check the network connection to ensure access to GitHub
- Clear the browser cache and try again
Q2: Three‑Party Control Settings entry is grayed out and cannot be clicked?
- Device has been added to a power station → Operation required in the power station settings page
- Device is currently offline → Wait for the device to come back online
- Device firmware not supported → Check for firmware updates
Q3: How to back up my configuration?
- Regularly back up Home Assistant configuration (including integration settings)
- Record the device's IP address and port number
- Take a screenshot of the Three‑Party Control Settings page in the Anker App
Q4: What if the device shows offline?
Please check the following:
- Confirm whether the device is online in the Anker App
- Check if the device's Wi-Fi connection is normal
- Make sure Home Assistant and the device are on the same local network
- Verify that the device IP address is correct (IP may have changed)
- Ensure the ModBus TCP switch is enabled in the Anker App
- Try restarting the device or reconfiguring Wi-Fi
- Check if the router is working properly
Q5: How to check the real-time data update frequency of the device?
- The data update frequency of the ModBus TCP connection depends on the device working status and polling interval
- Solarbank devices usually update data every 5-10 seconds
- You can check the last update time of the entity in Home Assistant's "Developer Tools" → "States"
- If the update frequency is abnormal, check the network connection and device load
Q6: Can I monitor multiple energy storage devices or power stations?
Yes. Each device requires:
- To be added separately as an integration instance (using their respective IP addresses)
- Each device will create independent entities in Home Assistant
- You can display all device data uniformly in the dashboard
- Automation can control multiple devices simultaneously
- Note: If the device has been added to a power station, you need to enable the ModBus TCP switch in the power station
Q7: Will Home Assistant control conflict with App control?
- When "Three-Party Control Mode" is enabled, the device will execute control commands from Home Assistant
- After turning off "Three-Party Control Mode", the device will continue to run the mode set in the Anker App
- It is recommended to clearly define the control method to avoid frequent switching
Q8: Can I control the device using both the Anker App and Home Assistant?
- Yes, you can use both at the same time, but you need to pay attention to control priority
- When "Three-Party Control Mode" is enabled, commands from Home Assistant have higher priority
- It is recommended to clearly divide tasks according to usage scenarios:
- App: Used for device configuration, firmware upgrades, and viewing detailed statistics
- Home Assistant: Used for daily automated control and monitoring
- Avoid modifying the same parameter on both platforms at the same time, as it may cause conflicts
Q9: Manually switched to xx mode but cannot execute?
- If the meter is not configured, switching to Smart Mode will fall back to Custom Mode
- If the electricity price is not configured, switching to TOU Mode or Dynamic Electricity Price Mode will fall back to Custom Mode
- If you need to switch between Three-Party Control Mode and Anker EMS, configure related settings in the Anker App first
Q10: What is the difference between Scenes, Scripts, and Automations?
- Scene: One-click setting of target states for multiple devices. Forces switching after clicking regardless of current state. Suitable for quickly switching working modes.
- Script: A sequence of actions including judgments, delays, and sequential execution. Can be triggered manually or called by automation. Suitable for complex logic flows.
- Automation: Executes automatically based on trigger conditions without manual intervention. Suitable for automatic responses according to time, sensor values, etc.
Q11: How to optimize automation response speed?
- Reduce polling interval: Adjust the update frequency in the integration configuration (but do not set it too low to avoid device load)
- Simplify automation logic: Avoid excessive nested conditions and complex templates
- Use script encapsulation: Encapsulate complex operations into scripts for better reusability
- Optimize trigger conditions: Use value range triggers instead of state change triggers
- Network optimization: Ensure devices and Home Assistant use wired connection or strong Wi-Fi signal
Q12: How to create energy usage reports?
Using Home Assistant's Energy Dashboard:
- Settings → Energy → Add grid consumption / solar production
- Select the corresponding sensor entities (e.g. total PV generation, total battery charge/discharge)
- Install the History Stats integration to summarize data for specific periods
Export historical data:
- Developer Tools → Statistics → Download CSV
Using third-party tools:
- Grafana: Visualize historical data
- InfluxDB: Long-term data storage
- Custom template sensors to calculate daily/monthly statistics
Q13: How to handle compatibility issues after device firmware upgrades?
- Before upgrading, check the Home Assistant community or GitHub Issues for known issues
- After upgrading, check if the integration is working properly
- If problems occur:
- Reload the integration (Settings → Integrations → Anker Solix → Reload)
- Check for available integration updates
- Try deleting and re-adding the integration
- It is recommended to perform firmware upgrades during non-critical periods
Q14: Is data secure when Home Assistant connects to the device?
- Local communication: All device control and data reading are done via local LAN connection
- No cloud dependency: Does not rely on Anker cloud servers
- Direct transmission: Data is transmitted directly between the local Home Assistant and the device
- Standard protocol: Uses ModBus TCP standard protocol to ensure secure communication
Q15: How to control third-party platform access permissions?
- Control ModBus access permissions via the Three‑Party Control Settings switch in the Anker App
- After turning off the switch, external platforms cannot access the device via ModBus
- Supports enabling/disabling the function at any time, fully controlled by the user
- It is recommended to turn off the three-party control function when not in use
Q16: How to protect my Home Assistant account and device information?
The following measures are recommended:
- Strong password policy: Use a strong password to protect your Home Assistant account
- Regular updates: Regularly update Home Assistant and integration versions
- Information confidentiality: Properly keep configuration information such as device IP address and port number
- Do not share information: Do not share device network connection information with others
- Log monitoring: Regularly check device access logs
Q17: How to ensure network connection security?
The following network security measures are recommended:
- Static IP: Set a static IP or DHCP reservation for the device to prevent IP changes
- Port restriction: Restrict the access range of the ModBus TCP port (502) in the router
- LAN access only: Do not expose Home Assistant directly to the public network
- VPN remote access: Use VPN for remote access to Home Assistant
- Regular checks: Regularly check network connection status and firewall rules
- Network isolation: Consider putting smart home devices in an independent VLAN
Q18: If I am worried about security, can I disconnect at any time?
- You can turn off the Three‑Party Control Settings switch in the Anker App at any time
- After turning off, Home Assistant will not be able to connect and control the device
- You can also delete the integration directly in Home Assistant
- The device will return to Anker App control mode without affecting normal use
- When re-enabling, just turn on the switch without reconfiguring